
Concrete has excellent compressive strength, and unreinforced concrete blocks can be stacked miles high before the bottom-most blocks gets crushed. But its strength under tension is more or less nonexistent, and to avoid placing it under tension ancient builders had a rule that the compressive force has to be concentrated within the middle third of a column. Modern builders work around this problem by making concrete into a composite, by embedding a rebar cage or mesh in a concrete slab, with enough thickness on either side so that when, under load, the armature stretches, the slab bends hardly at all. Because, it did bend, cracks would instantly open up on the convex side, letting in moisture, causing the rebar to corrode, expand, and cause “spalling” (meaning the concrete structure falls apart). What's more, this is bound to happen eventually in any case, and so reinfoced concrete slabs are engieered for eventual failure by being over-reinforced and under-cemented, because then they give warning of impending disaster in the form of cracks, as opposed to failing catastrophically.
Neither “eventual failure” nor “failing catastrophically” sounded good to me, and so I set out to calculate the required concrete slab thickness for QUIDNON's bottom, and came up with 6 inches. That translates to 16 tons of weight, not counting the rebar, the sides, and all the other structures I wanted to cast into the bottom. With all of that, the weight would push 20 tons of ballast, and that's just too much.
Also keep in mind that nobody has ever tried to join a concrete bottom to a plywood top, so I would be doing something rather experimental, if not to say adventurous. And adventurousness is, to me, akin to incompetence: I like my engineering tasks to be as boring as possible. The fun part comes after I do my boring engineering work, build it, and hand it over to other people to try to destroy. And find that they can't without trying really really hard. In general, there are two approaches to solving engineering problem: look it up (best) and guess the answer (not as good). In this case, I would only know that I guessed right if I manage to sail QUIDNON in all sorts of conditions and observe that nothing catastrophic happens, so I'd rather adhere to the much safer “look it up” strategy.
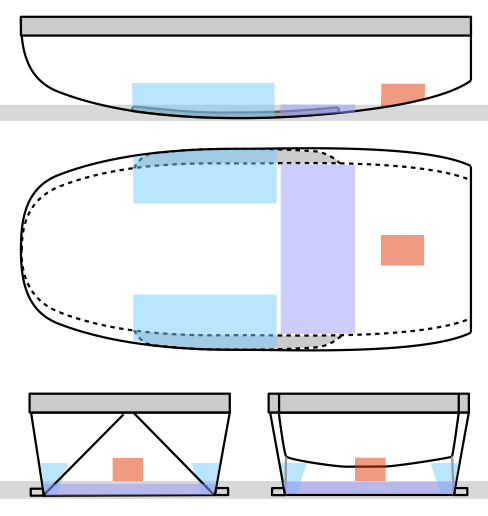
And so I decided to backtrack, and make the bottom out of plywood and fiberglass. The boat still needs ballast. There will be 5.8 tons of water ballast, which is good, but most of it is forward of the center-line. It needs to be balanced by about as much ballast aft. It works out to a 1-foot-thick slab of reinforced concrete located aft of the centerboard trunks, between the trunks and the aft cabins, under the galley, the heads and the companionway ladder. It will incorporate a rebar cage, located about 2 inches up from the bottom of the slab. That's because this concrete slab will serve as the mast step for the mainmast, taking a compression load from it, which will stretch the rebar at the bottom while compressing the concrete at the top. Here it is, shown in purple:
In addition to providing a counterbalance to the water ballast and serving as a mast step, the concrete slab will provide thermal mass. I will pour it over a few layers of dry fiberglass cloth encapsulated in plastic, to thermally insulated it from the hull and from the seawater below, and I will provide a couple of air conduits through it. One of them will be used for the exhaust of a rocket stove, to heat it up; the other will be used as part of the interior ventilation system, to keep the cabin warm. I will cover the rocket stove design in a future post.
As for the foremast step, that will just be a fat stick of wood spanning the width of the hull. I'll fiberglass the bottom of the stick, to take the tension load, so that the load on the stick itself is purely compressive.
As far as joining the bottom to the sides, I intend to follow the procedure that Chris Morejohn used on HOGFISH and his other designs: screw, glue and tape. I don't have his drawings with me, but from memory it looks something like this:

"What a boring design!" you might say. But that's how I like it. The fun part will be in seeing how it performs in big waves and lots of wind.
Good to see you weren't wedded to the concrete bottom, and that you are going with 'boring but works'. If the concrete wasn't load bearing, could you use something else for ballast? I recall Belgian block was used for ballast in old sailing vessels (which is why the streets of NYC are paved with them). Do the ballast elements have to be cast in one chunk? This could make trimming easier later, and also allow for more cargo if need be.
ReplyDeleteI'm assuming that the copper/fiberglass bottom idea is also 'tried and true'?
The only reason to cast the ballast in multiple pieces is to make it possible to pull it out piece by piece when hauling out for repairs. That is a consideration.
DeleteDave has had good experience with coppering a plywood bottom. Fiberglass certainly won't hurt; nor will making the plywood laminations thicker.
Hi and thank you for all you do. How does the copper attach to the bottom without perforating compromising the hull's integrity.
DeleteThe screws that hold the copper in place don't penetrate very deep into the plywood core of the hull, and each screw is bedded either with marine caulk or, better yet, with epoxy. So, each screw is about as waterproof as the rest of the hull. I will base my design on the TRILOBOAT experience, which has decades of experience sailing with a coppered plywood bottom.
DeleteBelgian block is nice, since it can be handled by hand; no block and tackle required, especially you want a minimum of external handling stuff.
ReplyDeleteThis is a sailboat, so block and tackle comes for free. The important thing is to have it involve as few operations as possible. Walking up and down the companionway ladder hauling bricks by hand is not something I want to do.
DeleteI had to look up Belgian block, because I've never heard that term before. Around here those are just called paving stones, and while granite is certainly heavy and hard, it's also more expensive than a great many other choices. Common gravel in spare buckets would work about as well, and if one is pouring concrete anyway, there is often extra concrete in the trucks that has to be disposed of. So small forms for odd things are common enough. I've seen the extra concrete poured into a 5 gallon bucket with a three foot long piece of 1" rope (knotted on each end) shoved down into the concrete with the middle sticking out above the concrete to form a lifting loop. It wasn't intended as movable ballast for a ship, but it could work. I don't know how much it weighted though.
DeleteSoapstone would have better heat sink characteristics, and if you don't care how it looks, broken pieces from manufacturing are relatively cheap. I keep about 15 pounds of broken soapstone on the top of my woodstove, and if I need to warm up a pocket or a cold bed; I just take an old wool sock, stick my hand in it, grab a small piece of soapstone with the socked hand, pull the wool sock over the stone, twist once, then back over the stone. I end up with a "happy rock", it's about 300 degrees but it doesn't give that heat up very fast (I can grab the soapstone barehanded if I don't have ahold of it for more than a second, which I can't do with anything else without getting burned) and the two layers of wool sock slow that heat transfer even more. I've found that it takes more than an hour for the happy rock to lose enough of it's heat to no longer be worth keeping in the pocket/bed. I've considered modifying one of my youngest daughter's stuffed animals so that I can shove one of the happy rocks into it and put it into her crib (she's two) but I haven't bothered because she seems to prefer to sleep chilled. She will kick the regular blankets off of her even when her room drops to 65 F, and her skin will still be warm to the touch. A hot blooded child, that one.
ReplyDeleteSoapstone has similar density to concrete (140 lbs/cu.ft.) so it makes fine ballast. I'll need to look up its thermal characteristics. But I doubt that it's cheaper than concrete, and better is always the enemy of good enough.
DeleteSoapstone's thermal characteristics are outstanding for a solid (water is better, but water is better at everything, and can't go over 212 in a container without a boom and a squish. I try to avoid boom & squish). I can't say that discarded soapstone pieces could be cheaper than concrete by weight. Probably not, actually. But if a thermal store is what you want out of your ballast, soapstone will perform far better than concrete.
DeleteA quick search tells me that the going price for "remnant" pieces of soapstone hovers around $1 per pound for small quantities, perhaps less for large quantities at the stonecutters' place of business. Definately cheaper than lead, not cheaper than concrete.
DeleteIf you use soapstone remants and then pour in concrete to fill it up, would the temperature changes destroy it?
DeleteSince the concrete slab is both ballast and structural (mast step) and I am thinking of using it as thermal mass, that's enough variables to play with. So, it will be concrete with rebar, nothing else.
DeleteHave you considered part of your ballast mounted on a track, so that it can be easily moved from port to starboard and back when you tack? I'm thinking along the lines of one of those trolleys with the roller skates that can be mounted to a steel I-beam. In this way, if you plan on a reach for many hours at a time, you can shove the ballast to the windward side and lock it there, or shove it to the middle and lock it there. In this way, you could still run light without too much heel, and still have the option of loading it down with heavy trade freight.
ReplyDeleteNo, nor will I ever. Shifting ballast? No, thanks. Ugh!
DeleteWell, somewhere between pebbles and a cast single piece ballast there is an optimum. But yeah, shifting ballast would be kinda scary.
ReplyDeleteWell, it's not like it hasn't been done...
Deletehttp://en.wikipedia.org/wiki/Canting_keel
The dome of the Pantheon in Rome is unreinforced and has stood for 2,000 years in a geologically active zone. I believe that volcanic ash is what makes Roman concrete so durable and flexible.
ReplyDeleteI marveled at it myself. It actually does adhere to the principle that all force lines must be projected through the middle third of any load-bearing bit of masonry. The dome itself is particularly interesting, because it's sectioned into lots of tiny domes. Quite a feat of engineering, for its time. But the all the medieval Gothic cathedrals (the ones that haven't collapsed) are even more amazing, and so is Hagia Sophia in Constantinople/Istanbul.
DeleteNone of this has ANYTHING to do with boat design, mind you.
Canting keels - wow. The article isn't too kind to them, though.
ReplyDeleteI wonder if Dmitry can get some volcanic ash for his concrete.
The idea of using buckets of concrete is interesting. A gallon of concrete is about 18 lbs, so 90 lbs for a 5 gallon bucket. It wasn't mentioned, but the 1 foot thick slab, and a bit of calculating from the picture gives about 84 square feet (so 84 cubic feet) or 12683 lbs of concrete, about 140 buckets. They would be higher than the 1 foot thick dimension, though.
Being able to swap out one bit of ballast for another fresh water tank or something else might be a good reason to build it in sections. It could allow for flexibility for cargo, and hiding spice, like in the Millennium Falcon.
The only reason the ballast might need to be removable is to effect repairs that might otherwise be impossible. And that's a serious consideration. But all that's really needed is a way of jacking up the weight so that the work can be done.
DeleteBolger did a few AS designs in steel and made the bottoms brutally heavy (3/8ths to 1/2"). His AS39 redesign had massive steel plates attached to the ply bottom with a shitpot of bolts and all sealed with 5200 donut gaskets. Always surprised me Bolger would take a perfectly good plywood bottom and swiss cheese it all to hell with bolts. His steel bottoms always seemed a lot more practical and also were a solid one piece structure once done. Seems concrete poured in a somewhat symmetrical hull would act as ballast and flatten the floor as well. Just sayin........
ReplyDelete"Just sayin" is a most unfortunate choice of words.
DeleteSemi crazy idea. AGM battery banks as ballast. Not necessarily all of it, but it could aid in trimming and has a dual purpose. Not good as a thermal mass, though.
ReplyDeleteI'll cover the electrical system in a future post. Peak preview: lead-acid batteries, 6V, golf-cart type.
DeleteThose batteries are going for $2-3/pound
DeleteI'm actually feeling the heat from a rocket stove on my back, whilst I write this. It's a dual-purpose cooking/heating rocket; a sort of baby mass-heater design. Baby because in this small boat there isn't space for the ten tons or so of heat-storage material - field-stone in my case - that a rocket mass-heater design needs, in order to go on giving out considerable heat for 10-30 hours after the fire is out.
ReplyDeleteSo my entire stove is just 22"X22"X27.5"; just a steel box full of stone, with the J-tube, in its tailored insulation box, set in the middle of it. This heats the stone very well, so that after a two hour burn, with the burn-tube of the J (the horizontal run) and the bottom of the riser tube both red-hot the whole time, the entire containment box becomes too hot to touch, as also the stones themselves. The whole J-tube, btw, is welded up from 4" diameter stainless-steel tube with 3mm wall thickness. I've used stainless in every rocket I've ever built, for the fire tubes themselves at least, and never had a burn-through yet. Mild steel, and even cast, can't match this performance, in my experience.
In my boat stove, I stick with this rule; but the rest of the structure, including the J-tube's insulation containment box, is in mild. Insulation can be perlite or vermiculite, but I use dry wood ash, which also works well (glassfibre can't stand the high temperatures, and melts back from the burn tube; tried it: no good).
My entire boat stove is encased in at least two inches of fibreglass insulation, except for the top, for which I think I shall try a lift-off insulating lid, to see how that improves heat-storage performance and overall space-heating time. The top has a machined-flat cast-iron 7.5" diameter hot-plate directly above the top of the riser, set dry-jointed in a hob that covers the whole top of the stove. The hob is a sandwich construction: two square 27"X27" 4mm mild-steel plates, one below the other an inch apart, welded together by inch-high steel-strip walls all round. Flue gases flow around and through the void between the upper and lower hob plates, from the riser tube top to the exhaust port at the back of the hob. They then go into a heat-exchanger above the stove, before final exit. The hob sits on the top of the riser tube, but isn't sealed to it; just dry joints everywhere. The partial-vacuum within the system when running seems to take care of preventing fume seepage into the cabin air. (cont.)
(part 2) The hob gets hot enough to simmer pans, whilst the hot-plate can be got hot enough to do rapid vigourous boiling, toasting, baking flat-bread on a skillet, wok-cooking, etc.
DeleteThe weakest point of this design is that the heat-storage mass is really too small, so that the stove is only giving out substantial cabin-warming heat for about 5-7 hours after fire-out, though with noticeable tempering warmth for another five hours or so after that.
The real eye-opener is the fuel economy. Habitually, I collect sticks from the surrounding woodlands hereabouts, as I walk my dogs. It takes about 15-20 minutes to collect enough finger-thickness sticks (no sawing, splitting, or any kind of axe work actually required, unless you cut and split larger timber to get your finger-thick fuel).
After years of running other rockets, and this one, for complete cooking and heating throughout British Winters (never very cruel these days), I have an accurate idea of how much fuel I'll need. Speaking of a standard five-gallon bucket: if you imagine one filled snugly just to the brim with sticks, I need three to four of those per twenty-four hour period, during frost; less in above-freezing Winter conditions. This will amount to maybe twenty pounds of sticks per day, maximum; usually less.
As veteran RMH-experts Erica and Ernie Wisner affirm, since a well-designed rocket mass heater is, first, very highly burn-efficient, and then tranfers the heat of the flue gases very efficiently into a storage medium, so that only lukewarm (sic!) carbon dioxide and water vapour are finally exhausted to the outside air, it can perform as well as a modern higher-efficiency orthodox woodstove on as little as a quarter of the fuel that the latter will need. Literally a quarter. I've demonstrated that to my own satisfaction on my rockets too: just phenomenal fuel efficiency! Though you might have to go to a Mark 3 or 4 iteration, to tweak it up to that level of thaumaturgic efficiency; each rocket is different, and fitting a really good one to its particular circumstances seems to be more of an art than an exact science, so far.
Thanks for a detailed description. This does sound like a good design for a sauna stove: a rocket stove plus a box of rocks for thermal ballast to throw water at to make steam.
DeleteFor a thermal mass heater to heat the cabin, I am thinking making the ballast of several parts, one bottom slab, and several smaller top slabs, poured on top of each other, and bolted together so that nothing ever shifts. The top pieces will have a path snaked through it by using plastic noodles to hold the space while the concrete sets. This path will be the exhaust from the rocket stove. A key requirement is that the rocket stove live under the cabin sole in the shower compartment and so stay completely out of the way unless it's needed. I have a plan sketched out, but that's basically what I am thinking.
For your ballast volume, that is also a heat mass, consider using a phase change material. If inside your rocket heater, it needs to have a high heat of fusion and a fairly high melting point, and not be flammable. An 'low' temp melting alloy such as Wood's Metal might be ideal. (sorry, latent heat of fusion too low to be useful)
ReplyDeleteAs for just a heat mass that ventilation is tempered with, the best I have been able to come up with is a tank of glycerol/glycerin (http://en.wikipedia.org/wiki/Glycerol) which has a melting point of approx. 64 F, a density of about 10 pounds per gallon (heavier than water ballast), a latent heat of fusion (useful btu's of heating/cooling) about half of that of water ice (water does everything better) and an unrefined value of about 10 US cents per gallon. It doesn't really have a lot of commercial uses, doesn't burn well as a fuel, and is a major byproduct of oil refining, soap manufacturing and biodiesel production; so it's pretty cheap. It's biodegradable and non-toxic (unlike wood's metal or hexadecane, an alkane hydrocarbon that also melts about 64 F). There are better materials to use as a phase change material, but all are (choose any two) too toxic to be used on a boat, too light to be used as a ballast material or too expensive because they are highly desired as a room temp PCM in other applications.
For the ballast, I am going to use reinforced concrete. It is not a phase change material, but it's cheap, it will serve a structural purpose as a mast step, it is very quick to put in place, with the hull itself plus some glassed-in plywood pieces serving as the mold and the rebar cut up and tied using galvanized wire, it will easily outlast the boat, and it has sufficient heat capacitance to be worth bothering to think about a very simple mass heater. Emphasis is on cheap and simple.
DeleteDmitry, I'm not sure if this has been observed before, but to me it is obvious that Quid Non is an eminently seaworthy design, based on form alone. It looks almost exactly like a man-made plesiousaur. So we know it will be inherently seaworthy. The biggest creatures to inhabit our planet are blue whales, and if you look at this painting, you can also clearly see a common design theme.
ReplyDeletehttp://alexamezcua.deviantart.com/art/Blue-Whale-dream-291953742
So, your design is in good company!
No, that's a new one on me, but it makes sense. I was thinking of the shape of an acorn sawed in half. But a blue whale makes it sound much for grand.
Delete