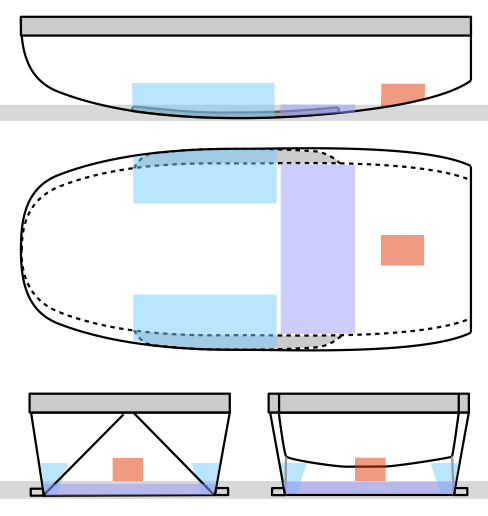
This will be the last post in this series. The design of QUIDNON is far enough along to start entering actual engineering drawings into CAD. The plan is to use an NC mill to cut out quite a lot of the plywood shapes. To be sure, there will still be some pieces that will end up being precision-fitted using a Sawzall and a grinder.
The main assembly technique is what's known as “glue and screw”: some piece of the hull is covered with a thin layer of epoxy, and the next piece is laid over it and screwed down using square-drive stainless steel screws. Each piece to be screwed on is pre-drilled with countersink holes, so that the screws pull the pieces together very tight, squeezing out excess epoxy and creating a very tight bond.
Once the plywood shapes are cut out, construction will proceed roughly as follows.
1. On a large flat surface (preferably a hangar of some sort, with a concrete floor), the outer layer of panels that will make up the perfectly flat deck will be laid out, inner side up. The deck will be made of 18 4x8 panels of 3/8 plywood. Nylon straps will be laid underneath the plywood, to make it possible to pull the hull together, and to lift it by crane when the time comes.
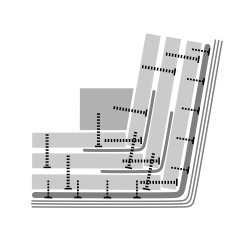
2. The inner layer of panels that make up the deck is then glued&screwed to it. These panels are laid out so that the joints are all staggered nicely. The inner layer's edge is in 1.5" from the outer layer, creating a ledge. The ledge is scraped clean of epoxy after it sets but before it hardens.
3. The first deadlight strip is glued&screwed to the underside of the deck, all around, using the ledge as a guide. The screws are directed at a 45° angle down. Two more layers of deadlight strips are laid down, building up the thickness to 1.2". These are precision machined so that the deadlight holes match up. The outermost strip is 1" narrower than the other two, creating a ledge, which is scraped clean of epoxy.
4. The innermost layers of the topsides, the bottom and the transom are glued&screwed together, using 6"-wide strips of epoxy to cover the seams on the inside, and laid aside.
5. The bulkheads are assembled and framed using fir 2x4's, which are cut to the right bevel using a table saw, and glued&screwed to the underside of the deck.
6. The pre-assembled topsides and transom are maneuvered into position and glued&screwed to the deadlight strips, using the ledge as a guide, but the screws are not yet tightened.
7. The pre-assembled bottom is overlaid over the bulkheads, maneuvered into position, and screwed down at the bow.
8. The sides and the bottom are pulled together using straps and bits of angle iron to align the chines. Open stretches of the joint between the topsides and the bottom are saturated with epoxy. The screws joining the topsides to the deadlight strip are tightened, and the epoxy is allowed to set.
9. Once the epoxy has set, the straps are removed and the places on the chines which they masked are saturated with epoxy. The inside corner of the chines is filleted with thickened epoxy.
10. The hull is built up by glue&screwing additional layers of plywood to the topsides, the transom and the bottom. After each layer is added, the chines are fiberglassed with a layer of fiberglass tape.
11. Once the hull is built up to full thickness (3 layers of 1/2" plywood all around, 4 at the bottom). The chine runners are built up. The outermost layer of the bottom contains chine runners, to which additional crescents of plywood are epoxied and glassed to build up the chine runners to a 2" thickness.
12. Fiberglass mat is nailed to the topsides using bronze annular nails, saturated with epoxy, and ground off along the deadlight strips and the chines.
13. Three layers of fiberglass cloth are draped over the entire structure, deadlight strips included, and saturated with epoxy.
14. The bottom is barrier-coated, then bronze sheets are laid on the bottom and screwed down, each screw bedded with 3M 5200.
15. The topsides and the deadlight strips are faired and sanded for a flat surface, then primed and painted. The topsides are painted black for the best passive solar performance. The deadlight strips are left with the bright white primer, because they will be overlaid with bronze lexan which will give them color.
16. The hull is flipped over. The deck is covered with fiberglass mat (nailed down with bronze annular nails) and saturated with epoxy.
17. Three layers of fiberglass cloth are draped over the deck and saturated.
18. Aluminum diamond plate is overlaid on the deck and screwed down with screws bedded with 3M 5200.
19. Deck beams and gunwales (which are steamed out of solid hardwood) are lag-bolted up through the deck and to each other, sealed with epoxy, primed and painted.
20. The hull is now complete, ready to receive the pilot house and the cabin can be outfitted.


