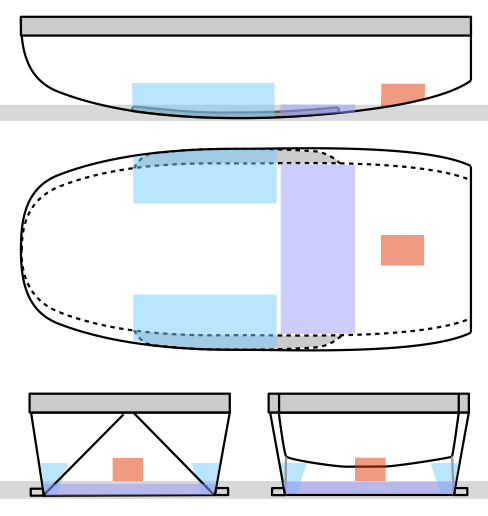
The purpose of this project is to design and mass-produce kits for a floating tiny house that can sail. It combines high-tech modeling and fabrication and low-tech assembly that can be carried out DIY-style on a riverbank or a beach. This boat is a four-bedroom with a kitchen, a bathroom/sauna, a dining room and a living room. The deck is big enough to throw dance parties. It can be used as a river boat, a canal boat or even a beach house. It's rugged and stable enough to take out on the ocean.

Friday, January 30, 2015

Construction plan

This will be the last post in this series. The design of QUIDNON is far enough along to start entering actual engineering drawings into CAD. The plan is to use an NC mill to cut out quite a lot of the plywood shapes. To be sure, there will still be some pieces that will end up being precision-fitted using a Sawzall and a grinder.

The main assembly technique is what's known as “glue and screw”: some piece of the hull is covered with a thin layer of epoxy, and the next piece is laid over it and screwed down using square-drive stainless steel screws. Each piece to be screwed on is pre-drilled with countersink holes, so that the screws pull the pieces together very tight, squeezing out excess epoxy and creating a very tight bond.

Once the plywood shapes are cut out, construction will proceed roughly as follows.

1. On a large flat surface (preferably a hangar of some sort, with a concrete floor), the outer layer of panels that will make up the perfectly flat deck will be laid out, inner side up. The deck will be made of 18 4x8 panels of 3/8 plywood. Nylon straps will be laid underneath the plywood, to make it possible to pull the hull together, and to lift it by crane when the time comes.

2. The inner layer of panels that make up the deck is then glued&screwed to it. These panels are laid out so that the joints are all staggered nicely. The inner layer's edge is in 1.5" from the outer layer, creating a ledge. The ledge is scraped clean of epoxy after it sets but before it hardens.

3. The first deadlight strip is glued&screwed to the underside of the deck, all around, using the ledge as a guide. The screws are directed at a 45° angle down. Two more layers of deadlight strips are laid down, building up the thickness to 1.2". These are precision machined so that the deadlight holes match up. The outermost strip is 1" narrower than the other two, creating a ledge, which is scraped clean of epoxy.

4. The innermost layers of the topsides, the bottom and the transom are glued&screwed together, using 6"-wide strips of epoxy to cover the seams on the inside, and laid aside.

5. The bulkheads are assembled and framed using fir 2x4's, which are cut to the right bevel using a table saw, and glued&screwed to the underside of the deck.

6. The pre-assembled topsides and transom are maneuvered into position and glued&screwed to the deadlight strips, using the ledge as a guide, but the screws are not yet tightened.

7. The pre-assembled bottom is overlaid over the bulkheads, maneuvered into position, and screwed down at the bow.

8. The sides and the bottom are pulled together using straps and bits of angle iron to align the chines. Open stretches of the joint between the topsides and the bottom are saturated with epoxy. The screws joining the topsides to the deadlight strip are tightened, and the epoxy is allowed to set.

9. Once the epoxy has set, the straps are removed and the places on the chines which they masked are saturated with epoxy. The inside corner of the chines is filleted with thickened epoxy.

10. The hull is built up by glue&screwing additional layers of plywood to the topsides, the transom and the bottom. After each layer is added, the chines are fiberglassed with a layer of fiberglass tape.

11. Once the hull is built up to full thickness (3 layers of 1/2" plywood all around, 4 at the bottom). The chine runners are built up. The outermost layer of the bottom contains chine runners, to which additional crescents of plywood are epoxied and glassed to build up the chine runners to a 2" thickness.

12. Fiberglass mat is nailed to the topsides using bronze annular nails, saturated with epoxy, and ground off along the deadlight strips and the chines.

13. Three layers of fiberglass cloth are draped over the entire structure, deadlight strips included, and saturated with epoxy.

14. The bottom is barrier-coated, then bronze sheets are laid on the bottom and screwed down, each screw bedded with 3M 5200.

15. The topsides and the deadlight strips are faired and sanded for a flat surface, then primed and painted. The topsides are painted black for the best passive solar performance. The deadlight strips are left with the bright white primer, because they will be overlaid with bronze lexan which will give them color.

16. The hull is flipped over. The deck is covered with fiberglass mat (nailed down with bronze annular nails) and saturated with epoxy.

17. Three layers of fiberglass cloth are draped over the deck and saturated.

18. Aluminum diamond plate is overlaid on the deck and screwed down with screws bedded with 3M 5200.

19. Deck beams and gunwales (which are steamed out of solid hardwood) are lag-bolted up through the deck and to each other, sealed with epoxy, primed and painted.

20. The hull is now complete, ready to receive the pilot house and the cabin can be outfitted.

Thursday, January 29, 2015

Electrical system

The primary purpose of QUIDNON is to serve as a floating residence. As such, it has to provide all the usual services that normally involve electricity: refrigeration, lighting, communications and the ability to charge mobile devices (cell phone, tablets, laptops). Where the energy for all this comes from depends on where the boat is. While marinas provide shore power (in North America this is either 30A or 50A 110VAC), this power is unavailable when living at anchor or at a mooring (the two most economical ways to live, since in many places, in Northeastern US especially, marina slip fees can add up to almost as much as renting an apartment on land.

With this in mind, I plan to equip QUIDNON for both marina living and for anchoring out. The elements I intend to use to piece together this system are all proven ones—I have used them all and found that they work and hold up extremely well. They are also all relatively cheap, by virtue of the fact that the word "marine" does not occur in their product descriptions.

When living at the marina, the usual procedure is to plug in a shore power cable and leave the battery charger on all the time. This keeps the batteries topped off all the time and in the fully charged state they last a very long time. Should shore power ever fail (because of a black-out or a transformer blow-out) the batteries provide uninterrupted power. When setting up a boat for marina living, it is very important to replace the stock shore cable plug with a SmartPlug, because the stock plug tends to burst into flames and burn the boat down. This almost happened to me—twice!

When living at a mooring or at anchor, QUIDNON has to generate its own electricity. During the summer months solar panels provide plenty of juice, but during the winter, when there is little sun, and when the solar panels are often covered up by snow, having a wind generator is very helpful. The usual procedure on yachts is to mount the wind generator atop a 10-foot pole, but that really doesn't get it up where the wind is strong, limiting its usefulness. On QUIDNON, there is not even a place to put a 10-foot pole that wouldn't interfere with the sails or the sheets, and so the only place to put wind generators is atop the masts, where there is room for two of them. This configuration is not recommended while sailing out on the ocean: the amount of windage and weight up top would pose a danger. But since the masts are easy to take down and put up, it's quite possible to have two configurations available, one for shoreside living, with two wind generators up top, and another for cruising, with the mastheads taken up with VHF antennae, nav/anchor lights and a wind instrument.


My favorite choice for a wind generator is a Sunforce 44444 which puts out a maximum of 400W (though it hardly ever blows that hard). Previous versions haunted the harbor with an interesting wailing/keening/whispering noise, which scared off seagulls, cormorants and neighbors alike, but the carbon fiber blade design has since been improved, and the latest version is quiet enough to use in a marina.


For solar panels, my current favorite choice is Renegy's 100W polycrystalline panels.


They are manufactured with a strong aluminum frame, and bolt down nicely to aluminum square channel using the supplied brackets, making installation easy. QUIDNON's pilot house roof can accommodate 8 of these, with room to spare:

Then there is the question of where to store all this power. My solution, which I know works well from experience, is to use Trojan T-105 6V 125Ah batteries. I plan to put 8 of them, in 2 banks, in a large, plastic-lined, vented battery box down in the bilge, under the cabin sole.


The two requirements for the battery enclosure are that it must never leak acid into the bilge, and that any hydrogen gas generated while charging is vented overboard (hydrogen is explosive under a wide range of concentrations and its flames are hot and invisible).

With all the sundry pieces added in (charger, charge controller, inverter, shore cable and plug, circuit breakers, wiring and outlets) the budget for the entire electrical system comes in just under $6,000 or 12% of the total budget, which is quite reasonable for a comfortable off/on-grid set-up.

There is one caveat that needs to be made with regard to all electrical/electronic systems, which is that they all work until they don't, and when they stop working there is nothing to be done but replace the component that failed. In this they are quite unlike most other parts of the boat, which can be repaired, finessed, jury-rigged, stitched up, plugged up and so on. All can be said about the reliability of an electrical system is that it works at the moment, but this is no guarantee that it will still be working the next moment, no matter how "reliable" it's supposed to be or how much you paid for it. Thus, there is no way to design anything electrical to last for the life of the boat, and there is nothing to be done about it.

Wednesday, January 28, 2015

Rudder Linkage Rethink

Jon from Virginia asked a really good question: What happens if one of the rudders gets hit sideways by something or other? Which part of the linkage gives way?

Well, this is something that does happen. I once had a towing rode get looped around the rudder blade, and it snapped my autopilot in half. After a bit of head-scratching, I came up with the following arrangement:

The stick pointing toward you is one of the tillers, which will actually be made of 1.5" round stock, but I am showing it as 1" square stock so that the drawing is easier to make and understand. The tiller is interrupted by 3 hinged plates (the axes of the hinge pins are shown in red). Front and back plates are welded to the tiller, and the front part of the tiller flops back and forth freely on the hinges. To stop that from happening under normal conditions, the two sides of the tiller are held together using a spring (here shown as a pink rubber band, to make it easier to draw, and also to be funny).

Under normal conditions, the spring is tight enough so that the hinges do not open. But under extreme overload conditions, the spring stretches, and one of the two hinges opens up, allowing the tiller to bend. When the extreme overload is removed, the spring snaps the plates back together, and all is well again.

In the real set-up, the spring will be tensioned using a bolt, to make the action adjustable. I will probably make it extra-tight to start with, then make it looser as I sail until it becomes a bit too loose, then tighten it up some, and leave it that way.

Nice feature of this set-up are:

• that the rudder linkage will not only refuse to destroy itself when a rudder blade is hit from the side, but
• that it will still be trying to steer, as well as possible under the circumstances,
• that one rudder going out commission temporarily will not affect the ability to steer with the other rudder, and
• that it will snap back into shape spontaneously and go right back to work once the overload condition is past.

Lastly, there is the need to do "back-end alignment" to make sure that the two rudder blades are perfectly symmetrical and don't cause any extra drag. To do this, I intend to add a bolt and a jam nut that goes through the outer one of the three plates on one of the tillers and pushes against a divet drilled into the next plate, opening the hinge up a crack.

I feel much better about it now.

Tuesday, January 27, 2015

Steering linkage


Because there are two rudders, and because they are angled out, to be maximally effective when the boat is heeled over, the steering linkage is rather intricate. Not counting the rudders and the wheel, there are 5 moving parts. The tie-rod and the aft whipstalk will be fabricated using 1-inch aluminum square stock, 1x¼" stainless steel strips and #10 stainless steel mechanical screws. The tillers will be made of 1.5" aluminum rod with flats milled into the ends at the right angles for attaching the stainless steel strips. The connections will be made using ¼" stainless steel bolts and Acetal washers. The entire assembly is intended to last for the life of the boat without any maintenance.

One interesting feature of this linkage is that it makes it possible to switch between wheel steering and tillerpilot steering at the pedestal. The wheel can be disconnected from the steering linkage simply by pulling back on it, causing the pinion gear splined to its shaft to disconnect from the rack which it drives. This is useful, because it lessens the inertial load on the tillerpilot from the angular momentum of the wheel. My preferred tillerpilot (Simrad TP32) can generate up to 100 lbs of force, but with considerable power drain and wear. With the wheel disconnected, the force required from it will be low, because the linkage is of lightweight aluminum and the rudders are balanced.

Another interesting feature this linkage makes possible is the ability to slow down the boat by toeing in the two rudders. That's right, unlike just about every other boat, QUIDNON will have a brake lever! The lever at the steering pedestal will drive a cable leading aft, which will act on the steering linkage to toe in the rudders. This feature will be useful when running downwind in overly boisterous conditions, because it will slow down the boat while pulling down the transom, lessening the likelihood of broaching or pitch-poling, and making it unnecessary (in most conditions) to use any of the usual techniques for slowing the boat down, such as trailing warps or deploying a drogue or a sea anchor.

Referring to the schematic diagram below, the green vertical plane on the left is the transom. The two rudder shafts are mounted to the outside of it, using brackets. Each rudder shaft is joined to a tiller through a horizontal pivot (axes of the pivot points are shown in blue) and each tiller is joined to one end of a tie-rod using vertical pivots. At its center the tie-rod is joined to the aft whip-stalk using a two-axis pivot (left/right and fore/aft). Steering action is indicated using red and green arrows (red for starboard, green for port).

The aft whip-stalk is connected to the steering shaft through a fore-and-aft pivot. The steering shaft is mounted to the deck by brackets and rocks left/right along the centerline of the boat. It penetrates the aft wall of the pilot house and runs forward to the steering pedestal.

The forward whipstalk is connected directly to the steering shaft inside the pedestal. At the top of the forward whipstalk is a rack, which is moved left/right by a pinion gear splined to the wheel shaft. The forward whip-stalk also holds a pin (not shown) for mounting a tillerpilot. Before engaging the tillerpilot, the tip of its telescoping arm is snapped onto the pin, and the wheel is pulled back on its shaft, disengaging the pinion from the rack in order to reduce the load on the tillerpilot.

Magenta arrows indicate the action of the brake lever. When actuated, it introduces a bend into the aft whipstalk, making it shorter. In turn, this causes the two tillers to pivot down. Because of the angle of the rudder posts, this has the effect of towing in the rudder blades by a few degrees.

Referring to the diagram above, the axes of the tillers incorporate a 10º twist, each in the opposite direction. Because of this deviation from horizontal, when the tie-rod (shown here in cyan) is pulled down, the rudder posts (yellow) rotate inward. When the rudder blades are towed in, they pull down the transom and induce drag. Note that it will still be possible to steer the boat even with the rudders toed in.

Monday, January 26, 2015

Concrete Bottom Rethought

I haven't studied concrete to any great extent—up until now. It is ubiquitous, and is one of the most ancient and well-understood construction materials, right after mud brick and plaster. It has a bad reputation as a boatbuilding material because of all the failed ferrocement projects, but that's not concrete, that's cement plaster over wire mesh. I was planning to do something different: create a steel-reinforced concrete slab for the bottom. And so I delved into the details on engineering concrete slabs, and came up with an answer that didn't please me at all.

Concrete has excellent compressive strength, and unreinforced concrete blocks can be stacked miles high before the bottom-most blocks gets crushed. But its strength under tension is more or less nonexistent, and to avoid placing it under tension ancient builders had a rule that the compressive force has to be concentrated within the middle third of a column. Modern builders work around this problem by making concrete into a composite, by embedding a rebar cage or mesh in a concrete slab, with enough thickness on either side so that when, under load, the armature stretches, the slab bends hardly at all. Because, it did bend, cracks would instantly open up on the convex side, letting in moisture, causing the rebar to corrode, expand, and cause “spalling” (meaning the concrete structure falls apart). What's more, this is bound to happen eventually in any case, and so reinfoced concrete slabs are engieered for eventual failure by being over-reinforced and under-cemented, because then they give warning of impending disaster in the form of cracks, as opposed to failing catastrophically.

Neither “eventual failure” nor “failing catastrophically” sounded good to me, and so I set out to calculate the required concrete slab thickness for QUIDNON's bottom, and came up with 6 inches. That translates to 16 tons of weight, not counting the rebar, the sides, and all the other structures I wanted to cast into the bottom. With all of that, the weight would push 20 tons of ballast, and that's just too much.

Also keep in mind that nobody has ever tried to join a concrete bottom to a plywood top, so I would be doing something rather experimental, if not to say adventurous. And adventurousness is, to me, akin to incompetence: I like my engineering tasks to be as boring as possible. The fun part comes after I do my boring engineering work, build it, and hand it over to other people to try to destroy. And find that they can't without trying really really hard. In general, there are two approaches to solving engineering problem: look it up (best) and guess the answer (not as good). In this case, I would only know that I guessed right if I manage to sail QUIDNON in all sorts of conditions and observe that nothing catastrophic happens, so I'd rather adhere to the much safer “look it up” strategy.

And so I decided to backtrack, and make the bottom out of plywood and fiberglass. The boat still needs ballast. There will be 5.8 tons of water ballast, which is good, but most of it is forward of the center-line. It needs to be balanced by about as much ballast aft. It works out to a 1-foot-thick slab of reinforced concrete located aft of the centerboard trunks, between the trunks and the aft cabins, under the galley, the heads and the companionway ladder. It will incorporate a rebar cage, located about 2 inches up from the bottom of the slab. That's because this concrete slab will serve as the mast step for the mainmast, taking a compression load from it, which will stretch the rebar at the bottom while compressing the concrete at the top. Here it is, shown in purple:


In addition to providing a counterbalance to the water ballast and serving as a mast step, the concrete slab will provide thermal mass. I will pour it over a few layers of dry fiberglass cloth encapsulated in plastic, to thermally insulated it from the hull and from the seawater below, and I will provide a couple of air conduits through it. One of them will be used for the exhaust of a rocket stove, to heat it up; the other will be used as part of the interior ventilation system, to keep the cabin warm. I will cover the rocket stove design in a future post.

As for the foremast step, that will just be a fat stick of wood spanning the width of the hull. I'll fiberglass the bottom of the stick, to take the tension load, so that the load on the stick itself is purely compressive.

As far as joining the bottom to the sides, I intend to follow the procedure that Chris Morejohn used on HOGFISH and his other designs: screw, glue and tape. I don't have his drawings with me, but from memory it looks something like this:
The edges of the plywood are screwed together, the joint is saturated with thickened epoxy with a high-strength adhesive filler, then fiberglass tape is applied over the joint, and then the procedure is repeated, screwing and gluing each additional layer of plywood until the right thickness is reached. Then the whole structure gets covered with fiberglass mat, which is nailed down using bronze annular nails, and saturated with epoxy. Then three layers of fiberglass cloth are applied over that. Then the topsides are made smooth using fairing compound, primed and painted. In the case of QUIDNON, the bottom will receive a layer of copper cladding, so that it never needs painting.

"What a boring design!" you might say. But that's how I like it. The fun part will be in seeing how it performs in big waves and lots of wind.

Sunday, January 25, 2015

Boats for post-cheap oil survival

This is a guest post from Ian Swan. As some of you know, I have sold my shoreside residence, and for more than a year now I have been living aboard and sailing up and down the east coast of the US. I have done this both as a lifestyle choice and as a way to minimize costs, including fuel costs, and to maximize the available options. For many of you, such a dramatic change of habits is out of the question. But this is not to say that you should neglect to look at boats as an important element of your post-collapse preparations. Ian's article takes this subject, which for most people resides in the realm of daydreams, and brings it down to the level of practical reality. Unlike many sailing experts that might try to impress you with their opinions, Ian knows his stuff, and, very importantly, he isn't trying to sell you anything. So if you are one of the many people who think that having a "just in case" boat might be a good idea, but have not acted on it, this article is for you.

To introduce myself: I am a New Zealander living near the coast in the North Island. I also lived for nine years in the South Pacific Islands, where I was able to observe primitive, third world living conditions. I share the view that peak oil is going to have a big effect on our lifestyles, and the simultaneous arrival of economic troubles and climate change is setting up a "perfect storm". If things collapse as Dmitry, I, and many others are expecting, you may find yourself in the same situation as a third world hunter (fisherman), gatherer, and farmer. That was the normal situation for many in the South Pacific Islands when I lived there. I'm not saying that we will return to the stone age, or even to the dark ages, but cheap oil -- the basis on which the edifice of our current society is built -- is gone, and the debt bomb is about to explode at the same time. This combination could create a tipping point that could cast you into an economic and social situation which will rival the Great Depression. If you agree with this (and if you are visiting this site it suggests you might) then you should make some preparations, at least in your mind, about what you would do, and how you might survive in this scenario.

Specifically, you might want to ponder the question of food. It has always struck me how much easier it is to get protein from the sea by fishing, and gathering shellfish, crabs, and so on, compared with land-based hunting and gardening. The same applies to a lesser degree to a lake or a large river. There is always food to be had where land meets water, it's a particularly productive environment, once things settle down in a post collapse environment, living near water will offer many opportunities for fishing and hunting, and travel by water. One of the keys to exploiting the sea coast or a lake for food is a boat, or a canoe, and this brings me to the point of this article: we have an opportunity to prepare for post-oil and post-consumer society by getting an appropriate boat, or, better yet, several appropriate boats, as I have.

The use of boats as a means of transport should also be considered. In common with Dmitry, I believe that sail is the way to go. If the boat is small enough, then rowing or sculling can be the source of auxiliary power. The smaller the boat, the more effective and practical this manual propulsion can be.

This article is not intended to be an introduction to boating, so if boats, and especially sailboats, are outside your experience, then I suggest that you get some books on the subject. Older books may be better, since what I am suggesting here is not particularly modern or high tech.

If your experience is with power boats, then I would suggest that you need to change your thinking. The cost and availability of fuel may soon make a modern powerboat a useless asset. The large, high speed "fizz boat" is the pinnacle of gross, wasteful overconsumption of oil-based fuel. Fuel consumption in big, fast powerboats can sometimes be measured in gallons per minute, and it is certainly many gallons per hour. They make Hummers look good.

There is an opportunity right now to try and get used sailboats and sails, which can often be had for very little. A great place to start is your local Craig's list. A boat is quite a big item, so you don't want to have to go far to get one, or the cost of delivery will become significant. If the boat is a real bargain, it may be worth traveling to get it. Even if the hull itself is worthless, what's on it may be very valuable indeed. For instance, the modern Dacron sail is a dramatic improvement over a canvass/cotton sail in terms of durability and function. If, at some time in the future, when modern synthetic fiber is no longer available or affordable, you try to fit out a sailboat, you will curse your lack of foresight in not obtaining a cheap old Dacron sail. Oars are not cheap or easy to make either, so if you see some cheap used oars, grab them.

Think about what might happen to you and your family in a collapse scenario, and also think about what boat might be useful for your location and situation. Even if you live miles from water, have you seen how useful boats become if you are caught in a flood? Right now, there is the opportunity to buy, or even to get for free, old sailboats that are sitting unused and deteriorating in backyards. I know this because I have collected quite a few of them myself, often for a fraction of the value of their fittings and construction costs. One of the reasons for this is that most people do not want small sailboats any more: they want big yachts or high performance racing sailboats such as Lazers and Hobie cats, which leaves the older class of boats unloved and unwanted. Owners also do not want wood, or plywood, for the maintenance problem; so these go cheaply too. There are two types of sailboats available that I think are most suited to the "survivalist" and these are the small trailer sailer and the small sailing dinghy. I am not talking about a boat to live on, but a boat that you can use for fishing, perhaps to make short coastal passages, on lakes and rivers: something that might carry you plus a small load of cargo for trade if such conditions arose. A boat has huge carrying capacity compared to a cart, and, once it is supported by the virtually frictionless water, takes very little energy to move. The trailer boat is mobile, compared to a boat on a mooring or at a marina, and mobility gives you choice of location. The ongoing cost and worry of boats sitting in the water is a killer. I don't recommend them, unless you know that you are going to use them a lot, and have plenty of money. A boat sitting on a trailer, under a tarp, in your back yard, will cost you nothing.

If you study the canal boat industry, you will discover that boats have enormous energy efficiency and cargo weight advantages over the horse and cart and the pack horse. The canal boat was only replaced by rail because of its low speed. Take away cheap oil, and the boat will make an instant comeback as a freight carrier. Take away the roads, and suddenly the rivers and the seacoast will provide the only access. I grew up in a town called "Te Awamutu". Which literally translates from the Maori language as "The Path End". It was the point at which the local river was no longer deep enough to navigate by canoe. That's the way it was; and it soon may become that way again.

The practical, useful sailboat you should be looking out for is a 10 to 14-foot open sailing dinghy or a 14- to 18-foot cabin trailer sailer. These are boats of a size that you can manhandle to launch if necessary. You could drag then up a beach on rollers with manpower or block and tackle. A 20 foot boat is getting pretty big, but may be manageable if you have lots of strong men. You can get a plywood boat very cheaply, but the reason for this is that it may be rotten. In fact, I usually assume that it is, and only agree to pay salvage value. If it is on a trailer, the value of the trailer may be as much as the boat. What comes with the boat, in terms of gear and fittings, may be worth even more than the boat. I paid $500 for a derelict 21-foot boat that had an anchor, chain and rode that were worth $250 second hand and easily $500 to replace new. It also had a mast and rigging, two sets of sails (one brand new), lots of stainless steel fittings, and safety gear. I will probably never repair this boat, but I have it blocked up as a little emergency "cabin". Did I mention that it has 500 lbs of lead in the keel? (Lead now goes for about 90 cents a pound.) All this gear is worth something to me as I have other boats worthy of repair. In a survival situation, all this stuff will be gold. To be a collector like me, you have to have space to store the boats, and I am lucky as I have a small farm and some old barns. But there must be a few of you out there who have the space to store one boat at least.

An 11 or 12-foot dinghy is a good size for a fishing boat that can be sailed or rowed. A boat like this could be either plywood or fiberglass. Fiberglass will cost you more and be heavier, but it will also be virtually indestructible if it is well-made. An aluminum mast, with stainless wire rigging, and a Dacron sail are all standard on modern sailing dinghies. There should be a mainsheet and a pulley set for the mainsail, which vary in quality and can be expensive to buy new, and maybe a foresail jib with sheets. In New Zealand there is a dinghy of this type, called a Sunburst. The Mirror Dinghy would be the British equivalent. It was designed in the 1960s as a "family boat": mom, dad and the kids could go out for a sail or fishing. The kids could learn to row and to sail. It could take a little 3-horsepower outboard for longer trips. Great concept! What happened? It became a racing class. The boats were "refined," made self-bailing, no seats, redesigned for speed and minimum weight, and now cost $14,000 for a competitive boat. They are fragile and completely useless for fishing. This has been the pattern for modern sailing dinghies: they are fast, unstable, and uncomfortable. Most are unsuited to use as our "survival" utilitarian boat. You might be able to adapt one of these racing machines, making it useful by reducing the sail, fitting oarlocks for oars and adding seats and floorboards to give it strength. But even if you can't, at least you will get a mast and sails. I actually got one racing skiff with 4 sets of sails for $100. I figure the sails could be used on a big family trailer sailer for light wind days. But there are also perfectly reasonable sailboats out there if you look.

Whatever you can get in the way of a hull, a mast and some sails will be vastly supeior to anything that you might construct if you were to start from scratch. Of course is possible to build a wooden boat from timbers, make a mast from a straight pole, weave a sail from flax or cotton, and make the rigging from wire and rope. But this is a skilled task way beyond most of us, and I can assure you that having some kind of boat ready made -- any kind -- will be a lot easier. What I see as most important in a collapse situation is being able to make the transition from being completely dependent on the supermarket as your main food source to becoming self sufficient, and from the motor car and airplane to the horse and the boat for transport (and bicycles while they last). Eventually we, or the community we are part of, will have to re-learn the skills to make things from scratch with hand tools, and to croos oceans hand-made boats, as we had done for centuries. That's fine, but meanwhile, in the short term, we need to eat, and there is good fishing on that reef a mile offshore.

So if you have a driveway or a back yard you can use to store a boat, start looking now. A good size for trailer yacht is in the 16 to 22-foot range; they run up to 25-30 feet but these are expensive monsters, and you would need a big SUV or truck to haul and launch them. You would have to pay more for a fiberglass hull, but if you look on Craig's List or other local sources you will find the odd one going cheap for various reasons. Sometimes the owner just wants to move an unused boat and does not have the time or energy to "sell" it. Wives sometimes have a role in these decisions to sell boats. You just have to be there at the right time. Right now, people are under pressure financially, and need to sell their unused stuff, which may include their boat. I have bought some very well-made plywood boats a fiberglass outer layer (GOP, glass over plywood). I have also seen hulls that you could punch your fist through, as they were not made of marine ply. I see smaller, older fiberglass (GRP, glass reinforced plastic) trailer yachts on Craigs list in the $1000 to $2500 range. A new boat, provided someone is still making them, would cost $20,000 or more. Depending on your level mechanical skill, an outboard motor that comes with the boat may be worth having, especially if it is a simple 2-stroke. A new outboard may cost more than an old boat. Post cheap oil, an old, inefficient 2-stroke outboard may be expensive to run, but even when fuel is very expensive, a small engine may be a lifesaver when needed in an emergency, and worth having. If you only use it as a backup, fuel cost is minimal.

The trailer yacht usually has a small cabin with sleeping space for two (or more, but they have to be very good friends) and a minimal setup for cooking. It can be used for overnight trips, and is secure and dry in bad weather. It can be used as a sleeping "cabin" even on land. If it is raining and blowing hard, it will be more secure than a tent. There is usually a lifting centerboard, which allows the boat to be beached and sailed in shallow waters, which is a very useful feature. A conventional keelboat is very restricted as to where it can navigate. It is possible to capsize some trailer sailboats as the ballast is usually not as massive as with a keelboat, so be aware these boats are not bombproof, and sail conservatively until you really know what you are doing. With these boats, you have to be aware of what's happening with the wind and react quickly and appropriately. They are not ocean going yachts unless so equipped and sailed by experienced sailors. The reason I suggest older and second hand boats is that you get a lot of boat for your money. You don't want to spend a lot on something you might not use. Recycling is always a good principle.

Even if you plan to sail whenever possible, fuel efficiency is still an important consideration. One small trailer sailboat I bought has a small air cooled 3HP diesel engine in it. I would think you could hardly get a more energy efficient fishing boat than this. At slow speed, it goes for miles on a pint of diesel. The problem with many fishing vessels these days is that the cost of fuel is not covered by the value of the catch. Whole fleets of them sit tied up at the dock. This relates to the depletion of fish stocks as well as to fuel costs, but the result is the same: only a very appropriately sized and fuel efficient boat will remain economic on a cost/catch ratio. I think that my boat, with sail backup, might actually be efficient enough. The key to the fuel efficiency of small trailer sailboats is that they are displacement hulls being driven at less than their hull speed. This means they are slow, 5-6 mph, but very efficient. The faster you try to go, the less efficient they will be. In certain conditions, you can use motor and sail together. When fuel gets really expensive, motoring in a small boat may actually be the most efficient way of maximizing the load/mile of the fuel. It won't be fast, but it may be cost effective.

Other boat options to consider, which may be appropriate to individual situations, are kayaks, canoes, folding boats (Portabote is one company that makes them), and inflatable boats. I recently bought an inflatable kayak with the idea that I could carry it deflated on my back on a bike explore waterways that I can bike to. I can use it as a platform for spear fishing or shellfish collecting. Kayaks and canoes are good for small shallow rivers and lakes and can be carried by hand across or around obstacles. But people also make long ocean trips in appropriately equipped kayaks, and they make good fishing platforms with the right gear. Modern plastic kayaks are very durable.

Inflatable boats can be stored in small spaces, carried more easily deflated, and are very stable and great load carriers. They are harder to row, especially upwind, because of their high windage. When I was in the islands, I had a 10-foot inflatable which I could carry inflated on my back. I could carry it down steep banks and launch in places you could never get a trailer. The boat would carry 4 men and scuba gear for 4. A similar size hard dinghy would not do that safely. It was appropriate to the task and situation. But an inflatable is not as durable or long-lasting as aluminum or fiberglass, and is only good as a short-term survival boat. Portabotes, on the other hand, are made of thick dense plastic and fold up. You can row them and there is the possibility of a small sail, or a small motor. They are quite durable, and may be appropriate for your circumstances. Have a look at them on their website.

I hope I have given you some food for thought. The time to prepare is now, an the time to practice self sufficiency is now. And besides, boating and fishing are fun, an what could be a better incentive than that?

Saturday, January 24, 2015

What's new in square boats


I. Y. Repin
Barge Haulers on the Volga
Long-time readers of this blog probably know that there are such things in the world as square boats, and that they tend to do all that intricately modeled boats do, better and for a lot less money, plus they have a host of other advantages. But such knowledge is rare, even among sailors. I speak from experience, having recently spent a fair amount of time working on a square boat—my old Hogfish, which I have sold, and which is hauled out in a boatyard, being readied for her next tour of duty in the Caribbean and then, via the Canal, the Pacific. As I worked, various types of boaty/yachty people would come up to me and ask me questions. The typical question was “What is this thing?” usually followed by a comment, such as “It looks really unusual.”